Haremann

Haremann went through a few changes since his first appearence in the hugely popular (as if) The Adventures of Haremann and Harebert webcomic. But here is the hopefully final version of our hero.
Originally he is crocheted in size 40 hand-dyed Cebelia crochet cotton with 0.6mm hooks. However you can choose any type of yarn.
What you will need:
- Yarn
- Toy stuffing
- Crochet hook
- Thread for the nose
- A pair of eyes or yarn/thread if you decide on a stitched version
- Sewing needles for the threads, one of which you can thread in the yarn you do the crocheting with.
General notes
Every piece is starting with a magic circle with 6 or 5 sc in them.Determining the correct safety or glass eye size: start either with the body or the ears, the eye should be no less than 2 rows in diameter
Inc: make 2 sc (single crochet) into the same stitch
Dec: it's an almost invisible decrease, you insert your hook into the front loop only, swing around your hook and insert into the front loop of the next stitch, pull though the yarn on the two front loops and pull through again like in normal sc.
Triple dec: similar to the decrease but instead of just two stitches, you pick up the front loops of 3 stitches


How to read pattern repeats: For example (2 sc, inc) * 3 means you do the part in brackets 3 times: sc, sc, 2 sc into next stitch, sc, sc, 2 sc into next stitch, sc, sc, 2 sc into next stitch.
If something is not clear, just send me a mail to gabibo.craft@gmail.com or you can find me at https://www.facebook.com/gabibo.craft/. You can also find me on Instagram (@gabibo.craft), Twitter (@GabiboCraft) or Facebook: https://fb.me/gabibo.craft/.
Ears
| Round 1 magic circle, 6 sc | 6 stitches |
| Round 2 ( sc, inc )*3 | 9 stitches |
| Round 3 ( 2 sc, inc )*3 | 12 stitches |
| Round 4 ( 3 sc, inc )*3 | 15 stitches |
| Round 5 ( 4 sc, inc )*3 | 18 stitches |
| Round 6 ( 5 sc, inc )*3 | 21 stitches |
| Round 7-9 21 sc for 3 rounds | 21 stitches |
| Round 10 ( 5 sc, dec )*3 | 18 stitches |
| Round 11-12 18 sc for 2 rounds | 18 stitches |
| Round 13 ( 4 sc, dec )*3 | 15 stitches |
| Round 14-15 15 sc for 2 rounds | 15 stitches |
| Round 16 ( 3 sc, dec )*3 | 12 stitches |
| Round 17-18 12 sc for 2 rounds | 12 stitches |
| Round 19 ( 4sc, dec )*2 | 10 stitches |
cut yarn leaving 15-20 cm tail for sewing
Head
| Round 1 magic circle, 6 sc | 6 stitches |
| Round 2 ( inc )*6 | 12 stitches |
| Round 3 ( sc, inc )*6 | 18 stitches |
| Round 4 ( 2sc, inc )*6 | 24 stitches |
| Round 5 ( 3sc, inc )*6 | 30 stitches |
| Round 6 ( 4sc, inc )*6 | 36 stitches |
| Round 7-10 36sc for 4 round | 36 stitches |
| on round 8 mark the 6th and 17th sc, you will place the ears between these stitches | |
| Round 11 ( 4sc, dec )*3, 18 sc | 33 stitches |
| mark the second decrease with a bit of yarn, it will help later to find the top of the head | |
| Round 12 33sc | 33 stitches |
| Round 13 sc( 3sc, dec )*3, 17 sc | 30 stitches |
| Round 13 starts with an extra sc, I did it like this so the decreases line up with the ones in round 11 | |
| Mark the 5th and 13th stitch if you are using safety or glass eyes you will insert them later (on round 16 or 17 ) after the 5th and before the 13th stitch. | |
| Round 14 30sc | 30 stitches |
| Round 15 ( 3sc, dec )*6 | 24 stitches |
| Round 16-17 24 sc for 2 rounds | 24 stitches |
| if using safety eyes insert them now in row 13 6th and 13th stitch | |
| Round 18 ( 2sc, dec )*6 | 18 stitches |
| Round 19-20 18 sc for 2 rounds | 18 stitches |
| start stuffing the head | |
| Round 21 ( sc, dec )*6 | 12 stitches |
| Round 22 (sc, dec)*3, slip st | 9 stitches |
cut yarn leaving 15-20cm tail for sewing, finish stuffing the head, sew the hole shut (grab the front loop only with your needle on every second stitch, pull tight)
If you are using thread and tiny hook, after round 20 stuff the head firmly, crochet the remaining bit, sew shut and mush the stuffing around.
Body
| Round 1 magic circle, 6 sc | 6 stitches |
| Round 2 ( inc )*6 | 12 stitches |
| Round 3 ( sc, inc )*6 | 18 stitches |
| Round 4 ( 2sc, inc )*6 | 24 stitches |
| Round 5 ( 3sc, inc )*6 | 30 stitches |
| Round 6 ( 4sc, inc )*6 | 36 stitches |
| Round 7 ( 5sc, inc )*6 | 42 stitches |
| Round 8-13 42sc for 6 rounds | 42 stitches |
| Round 14 ( 5sc, dec )*6 | 36 stitches |
| Round 15-16 36sc | 36 stitches |
| Round 17 ( 4sc, dec )*6 | 30 stitches |
| Round 18-19 30sc for 2 rounds | 30 stitches |
| Round 20 ( 3sc, dec )*6 | 24 stitches |
| Round 21-22 24sc for 2 rounds | 24 stitches |
| Round 23 ( 4sc, dec )*4 | 20 stitches |
| Round 24 20sc | 20 stitches |
| Round 25 ( 3sc, dec )*4, slip st | 16 stitches |
cut yarn leaving 15-20 cm tail for sewing
Arms
| Round 1 magic circle 5 sc | 5 stitches |
| Round 2 ( inc )*5 | 10 stitches |
| Round 3-5 10 sc for 3 rounds | 10 stitches |
| Round 6 ( 4sc, dec )*2 stuff the paws | 8 stitches |
| Round 7-20 8 sc for 14 rounds, | 8 stitches |
cut yarn leaving 15-20 cm tail for sewing, then stuff arms lightly
If using thread, I only stuff the paws and leave the rest of the arm empty It's really tiny when using size 40 thread.
Legs
The trickiest part of the rabbit with lots of shaping, even if you normally don’t mark the beggining stitch of the round, this time around you should.| Round 1 magic circle 6 sc | 6 stitches |
| Round 2 ( inc )*6 | 12 stitches |
| Round 3 ( 3sc, inc )*3 | 15 stitches |
| Round 4-7 15 sc for 4 rounds | 15 stitches |
| Round 8 2dec, 5sc, in the next stitch we make the heel flap. Make a sc, chain 4, sc into the 2nd back bump from the hook, 2 sc into remaining back bumps and make another sc next to the first sc of the heel flap, 5sc | 21 stitches |
| Round 9 dec, 8 sc, 3 inc, 8 sc | 23 stitches |
| Round 10 dec, 4 sc, dec, 9sc, dec, 3 sc. This is not a full round (1 stitch left to complete round) but we will use this stitch in next rounds first decrease. | 20 stitches |
| Round 11 dec , 3sc, triple dec, 7sc, triple dec, 2sc. | 15 stitches |
| Round 12 3 sc, dec, 7sc, dec, sc. Start stuffing the feet | 13 stitches |
| Round 13 3sc, dec, 6 sc, dec. | 11 stitches |
| Round 14 4sc, dec, 2sc, dec, sc. | 9 stitches |
| Round 15-23 9 sc for 9 rounds. | 9 stitches |
Cut yarn leaving 15-20 cms for sewing. Stuff the legs lightly.
Making the heel flap
Round 8:


Round 9:

Tail
I usually make a pompom for the tail, however if you want to give it to kids, you should instead make a crocheted one.
| Round 1 magic circle 6 sc | 6 stitches |
| Round 2 ( inc )*6 | 12 stitches |
| Round 3 ( 3sc, inc )*3 | 15 stitches |
| Round 4 15sc | 15 stitches |
| Round 5 ( sc, dec )*5 | 10 stitches |
| Round 6 (dec)*3, slip st. (not a full round) | 7 stitches |
cut yarn, stuff tail and sew to the bottom of your rabbit.
Assembly
Sew the ears on the head between Round 8’s marked stitches.
Grab pins or extra long needles and pin the head to the body, start sewing on the head at the same round where the ears are.
Sew on the arms 2 rounds below the neckline.
Pin the legs to the body, leaving a slight gap between them and with feet pointing slightly outwards.

|

|
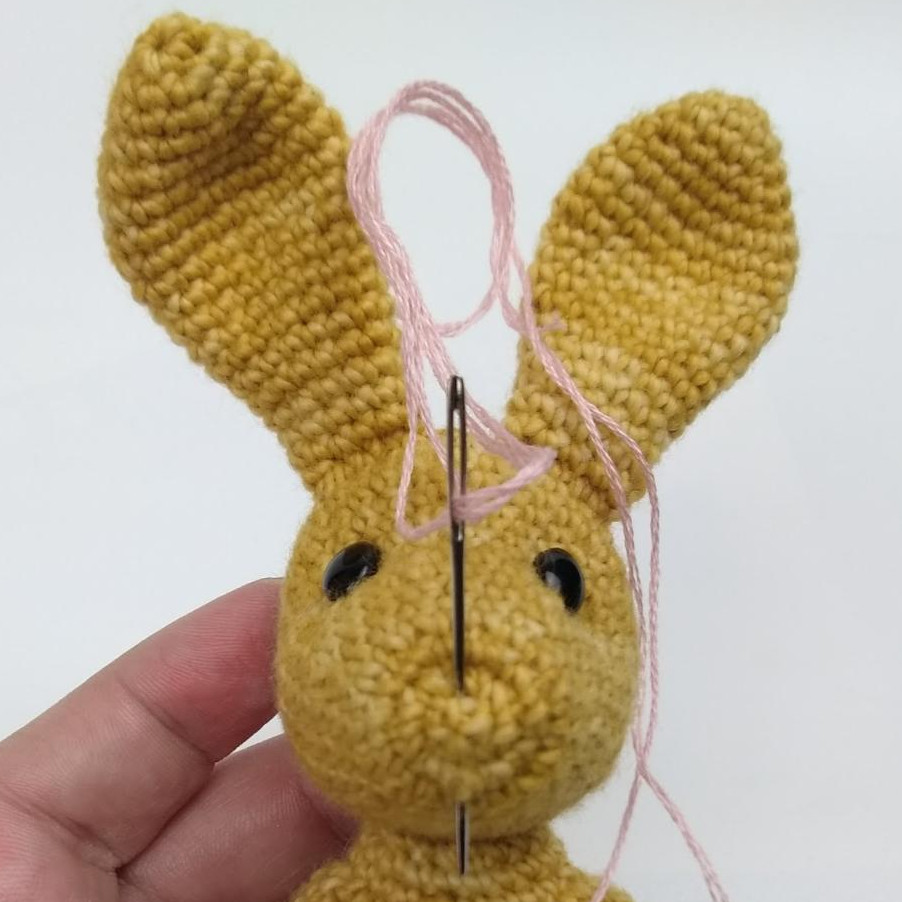
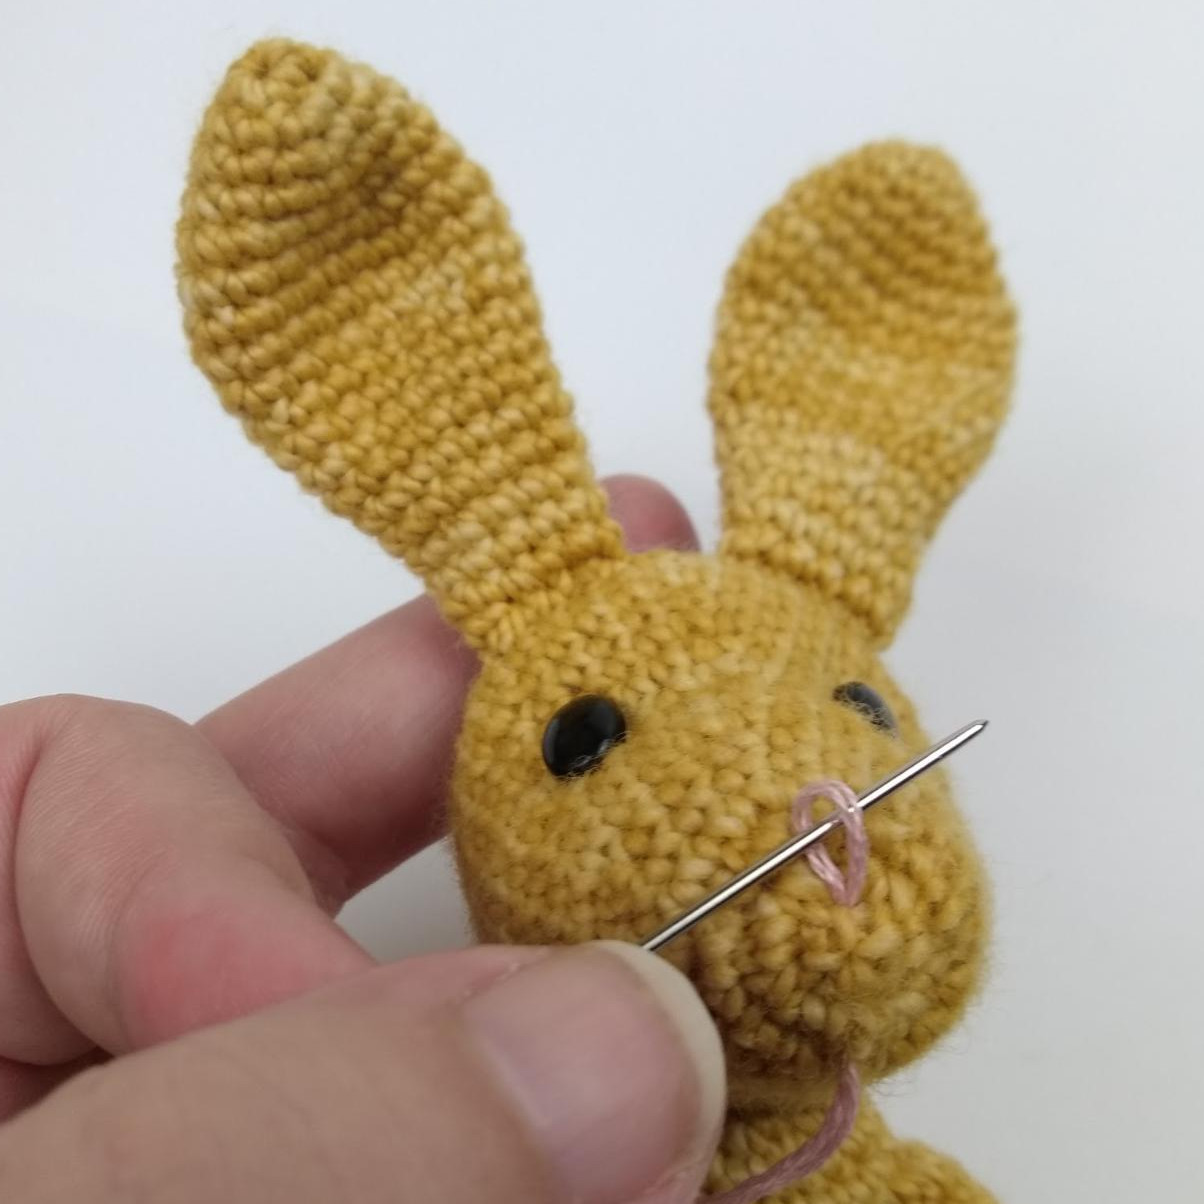
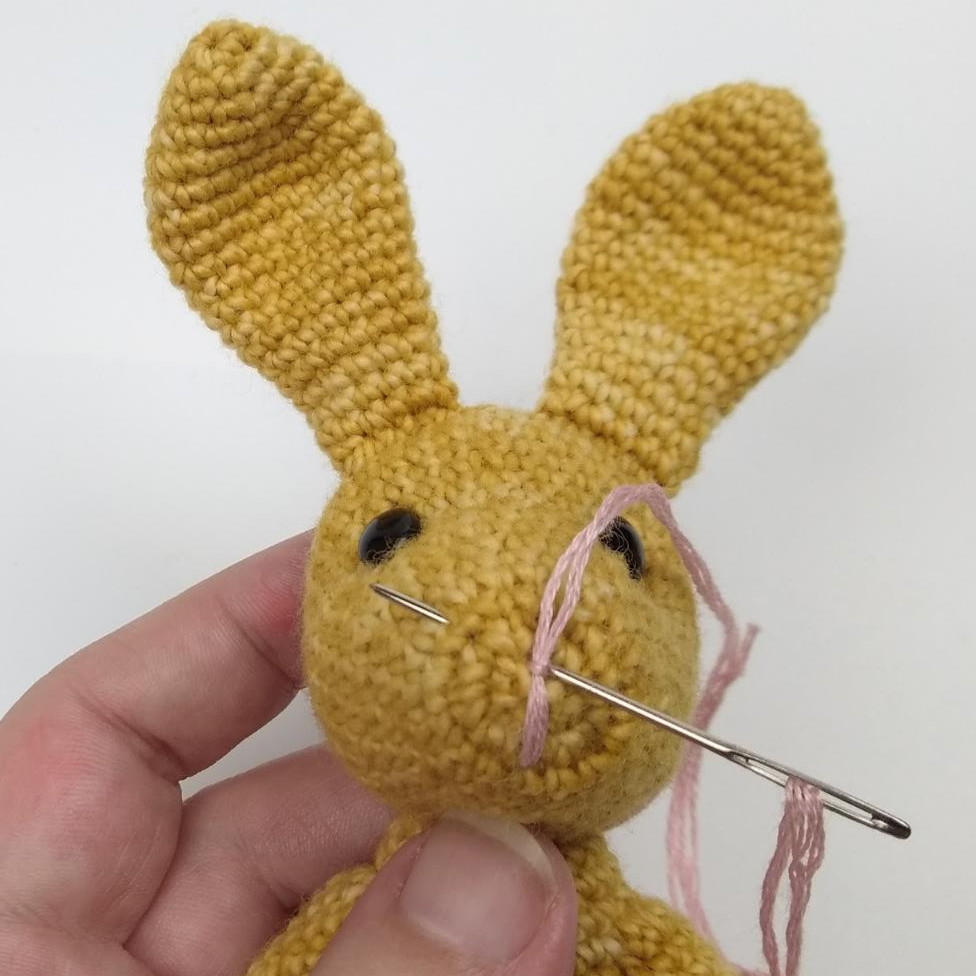
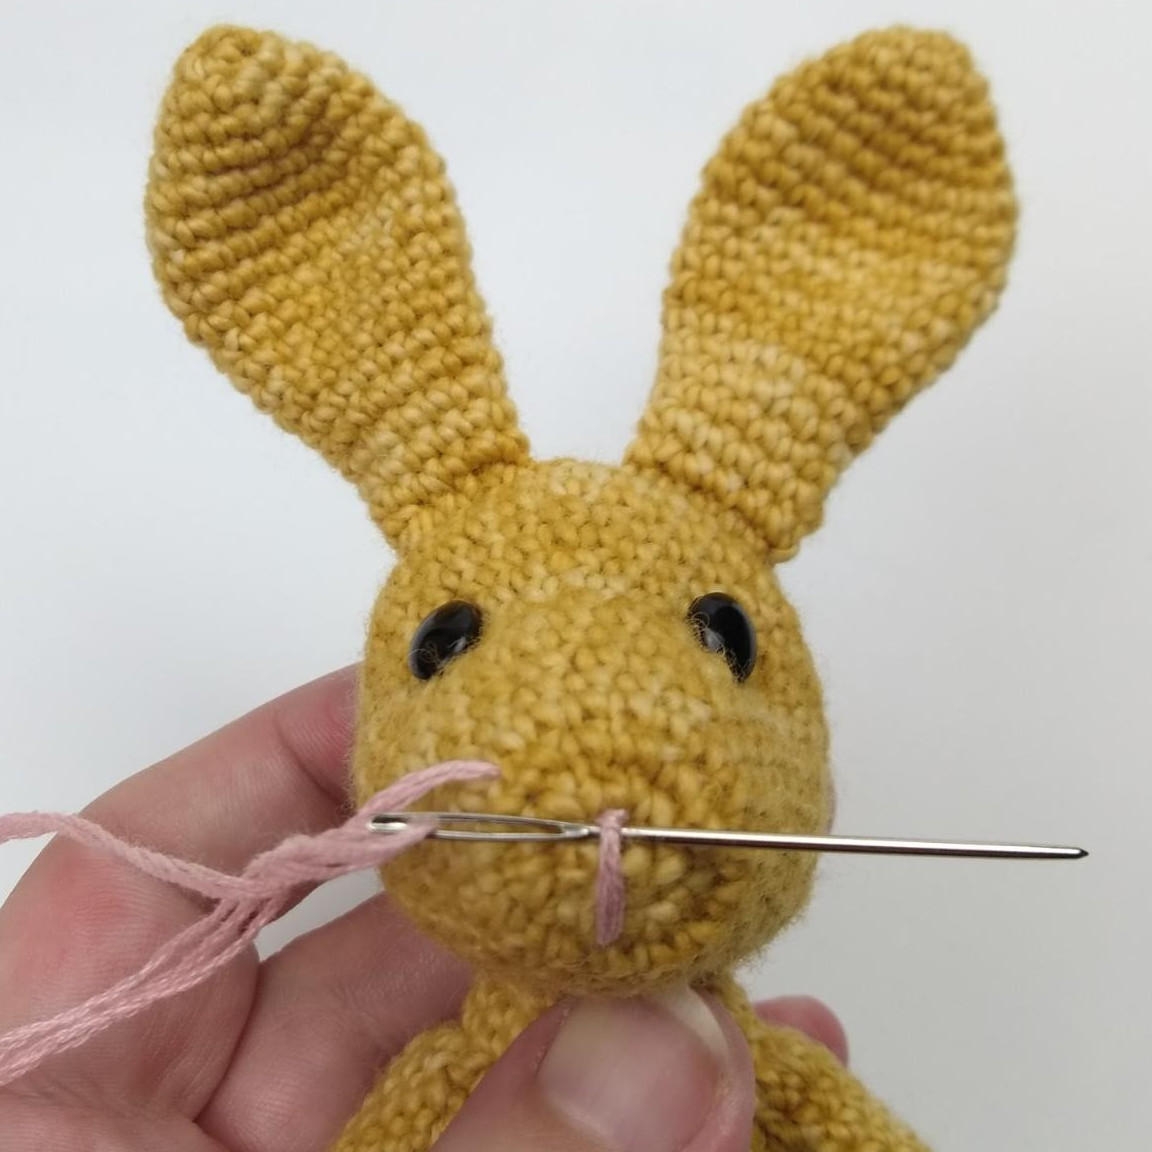
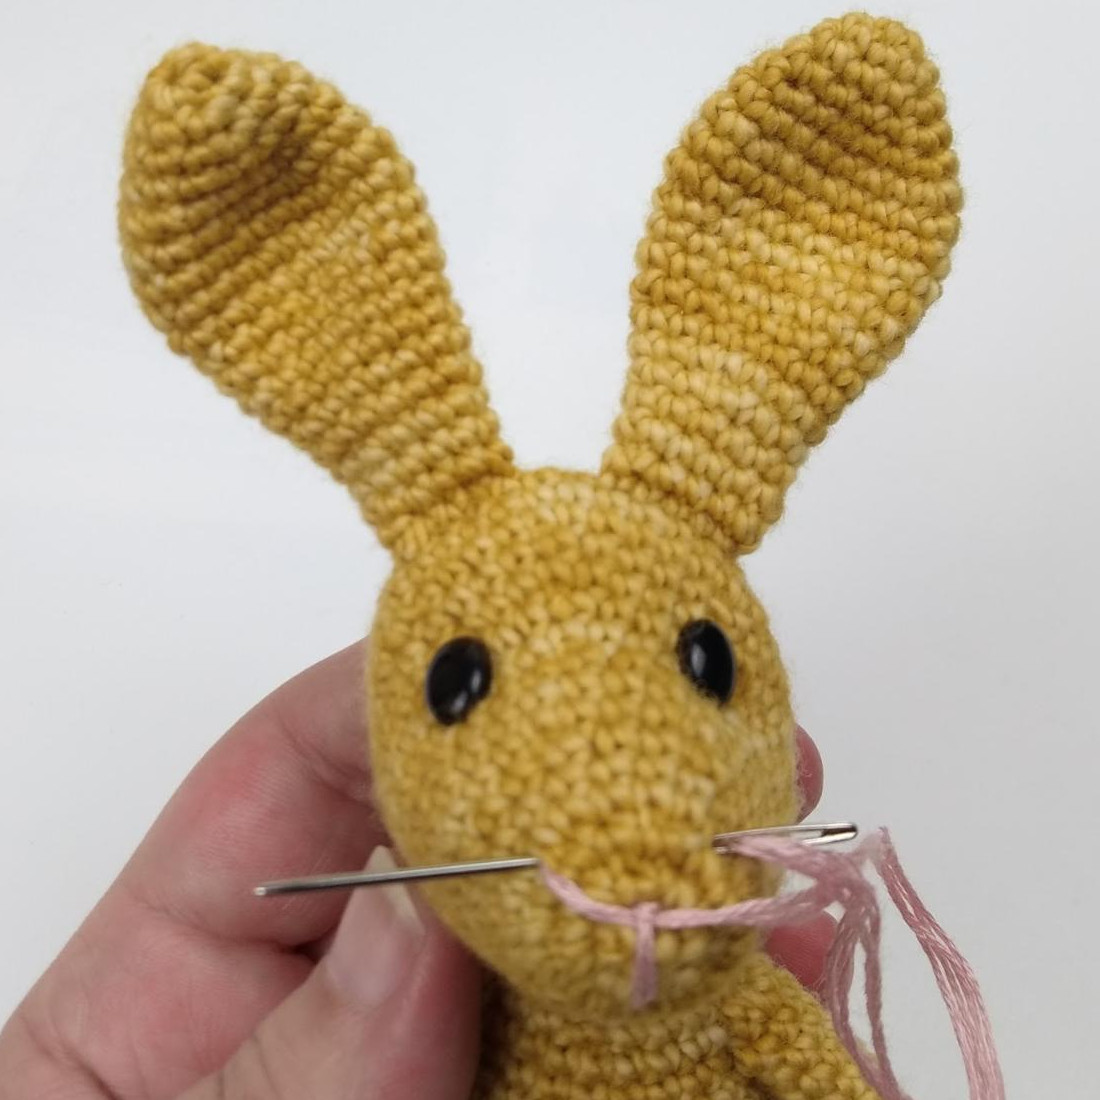
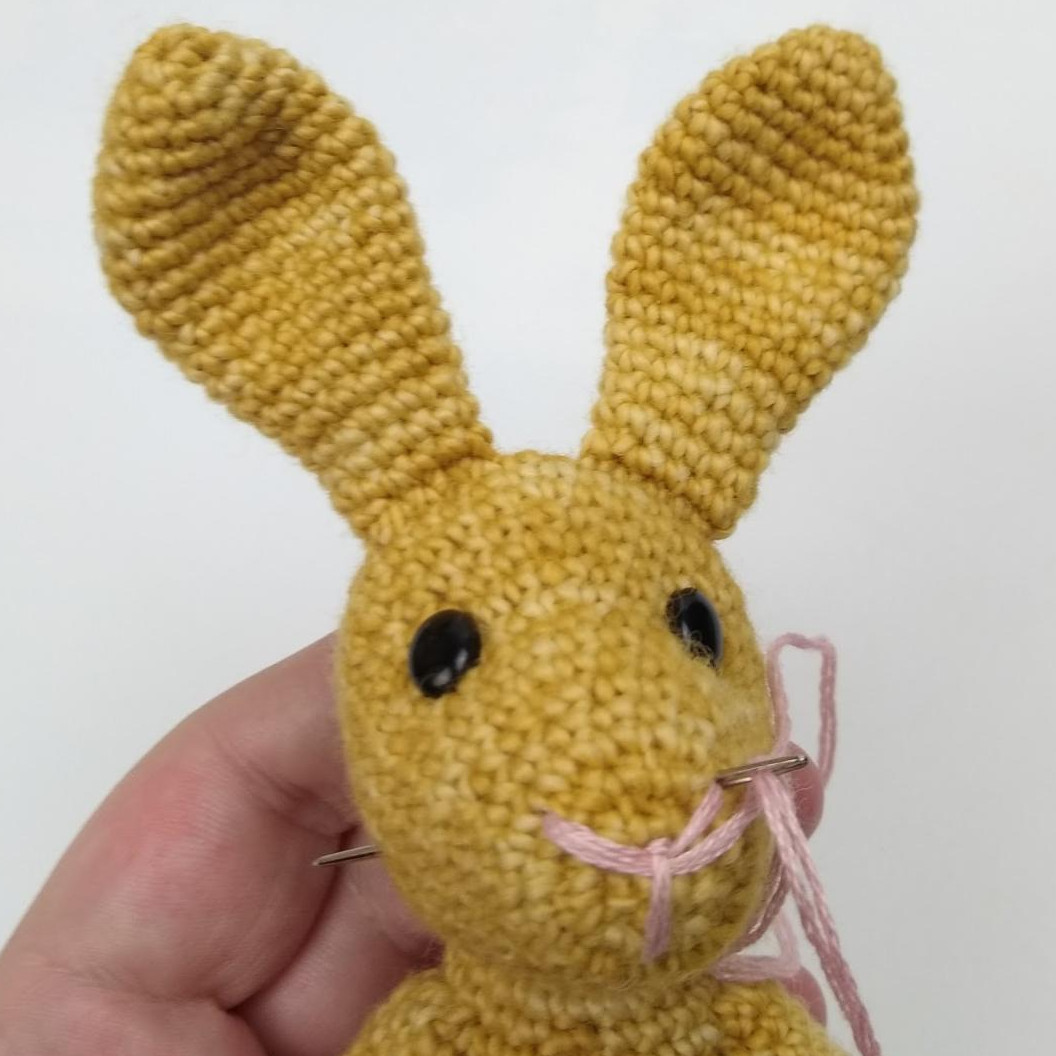
For the nose: use pink embroidery thread. If the thread consists of 6 strands, separate them into two 3 stranded threads (we will be using just one of the two 3 stranded threads). Now grab the needle and thread in both ends in so that you have a loop at one end. Follow photos for how to stitch the nose, then hide the leftover thread inside the body by stitching it criss-crossing inside the bunny so that you only have a few centimeters left.
|
|
|
|
|
|
And we're done, yay!